


今回は、PHP、MariaDBのインストールを行う。
Ruby on Railsが使いたいので、PHPはいらないのですが、勉強もかねて、ネコでもわかるシリーズは制覇しようかと思います。
参考)ネコでもわかる!さくらのVPS講座 ~第四回「phpとMariaDBをインストールしよう」
https://knowledge.sakura.ad.jp/9006/
やること
1. phpをインストールする
2. MariaDBをインストールする
まず、1. phpをインストールする
前提知識として、CentOS公式リポジトリではインストールしようとしているPHP7.1がなく、remiという別のリポジトリから取得する必要がある。
またremiを使うためには、EPEL(イーペル)という別のリポジトリが必要のようですが、さくらのVPSは設定済みのようです。
リポジトリという概念がいまいちわからない。
参考)リポジトリ (repository)
http://wa3.i-3-i.info/word15664.html
いまは色んなソフトの集まり、保管場所と理解しておこう。
remi用の設定パッケージをインストール
suコマンドでrootユーザーになった後、
# rpm -Uvh http://rpms.famillecollet.com/enterprise/remi-release-7.rpm
Retrieving http://rpms.famillecollet.com/enterprise/remi-release-7.rpm
warning: /var/tmp/rpm-tmp.o4gk1u: Header V4 DSA/SHA1 Signature, key ID 00f97f56: NOKEY
Preparing... ################################# [100%]
Updating / installing...
1:remi-release-7.4-2.el7.remi ################################# [100%]
#
phpのインストール
php本体だけでなく、phpの拡張パッケージも合わせて導入
# yum install --enablerepo=remi,remi-php71 php php-devel php-mbstring php-mysqlnd php-pdo php-gd
ずらずらーと出てきます
Is this ok [y/d/N]: y ⇒yを押して実行、これが2回出てきました。
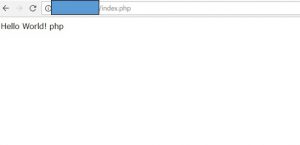
Complete! と出てきたので成功
無事、index.phpが表示されました。
phpの設定ファイルphp.iniを編集
[root@tk2・・・ www]# cd /etc
[root@tk2・・・ etc]#
[root@tk2・・・ etc]# cp php.ini php.ini.old
[root@tk2・・・ etc]# vim php.ini
/post_maxで検索、671行目を修正
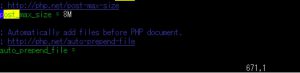
⇒post_max_size = 128M
/upload_maxで検索、824行目を修正
![]()
⇒upload_max_filesize = 128M
再起動して、設定反映
# systemctl restart httpd
次に、 MariaDBをインストールする
Mysqlをインストールしようと思ってたけど、現在の主流はMariaDBで、CentOS7ではMariaDBが標準なので、
MariaDBをインストールする。
Mysqlと互換性はあるみたい。
Ruby on Railsの構築の時に引っかからなければいいけど
# yum install mariadb-server
こちらもずらずらっと出てくる
Is this ok [y/d/N]: y
Complete! が出たので成功
MariaDBを起動し、サーバー再起動時にMariaDBを自動的に起動する設定を行う
[root@tk2・・・ etc]# systemctl enable mariadb
Created symlink from /etc/systemd/system/multi-user.target.wants/mariadb.service to /usr/lib/systemd/system/mariadb.service.
[root@tk2・・・ etc]#

[root@tk2・・・ etc]# systemctl start mariadb
[root@tk2・・・ etc]#

MariaDBにログインするためのパスワードを設定する
[root@tk2・・・ etc]# mysql_secure_installation

NOTE: RUNNING ALL PARTS OF THIS SCRIPT IS RECOMMENDED FOR ALL MariaDB
      SERVERS IN PRODUCTION USE!  PLEASE READ EACH STEP CAREFULLY!

In order to log into MariaDB to secure it, we'll need the current
password for the root user.  If you've just installed MariaDB, and
you haven't set the root password yet, the password will be blank,
so you should just press enter here.

Enter current password for root (enter for none):
OK, successfully used password, moving on...

Setting the root password ensures that nobody can log into the MariaDB
root user without the proper authorisation.

Set root password? [Y/n] Y
New password:
Re-enter new password:
Password updated successfully!
Reloading privilege tables..
 ... Success!


By default, a MariaDB installation has an anonymous user, allowing anyone
to log into MariaDB without having to have a user account created for
them.  This is intended only for testing, and to make the installation
go a bit smoother.  You should remove them before moving into a
production environment.

Remove anonymous users? [Y/n] Y
 ... Success!

Normally, root should only be allowed to connect from 'localhost'.  This
ensures that someone cannot guess at the root password from the network.

Disallow root login remotely? [Y/n] Y
 ... Success!

By default, MariaDB comes with a database named 'test' that anyone can
access.  This is also intended only for testing, and should be removed
before moving into a production environment.

Remove test database and access to it? [Y/n] Y
 - Dropping test database...
 ... Success!
 - Removing privileges on test database...
 ... Success!

Reloading the privilege tables will ensure that all changes made so far
will take effect immediately.

Reload privilege tables now? [Y/n] Y
 ... Success!

Cleaning up...

All done!  If you've completed all of the above steps, your MariaDB
installation should now be secure.

Thanks for using MariaDB!
[root@tk2・・・ etc]#
ログの内容確認
Enter current password for root (enter for none): ⇒何も入力せずにエンター
パスワードを入力して、後はすべてYで進む
Thanks for using MariaDB! が表示されればOK
これでMariaDBの初期設定が完了!
MariaDBへログインしてみる
[root@tk2・・・ etc]# mysql -u root -p
Enter password:
Welcome to the MariaDB monitor.  Commands end with ; or \g.
Your MariaDB connection id is 10
Server version: 5.5.56-MariaDB MariaDB Server

Copyright (c) 2000, 2017, Oracle, MariaDB Corporation Ab and others.

Type 'help;' or '\h' for help. Type '\c' to clear the current input statement.

MariaDB [(none)]>
無事ログインできました。
データベース一覧の表示
MariaDB [(none)]> show databases;
+--------------------+
| Database           |
+--------------------+
| information_schema |
| mysql              |
| performance_schema |
+--------------------+
3 rows in set (0.00 sec)

MariaDB [(none)]>
exitでログアウトできる
MariaDB [(none)]> exit
Bye
[root@tk2・・・ etc]#
これでPHPとMariaDBのインストールが完了!
次はphpMyadminのインストールをしてみようと思う。